

I would like to share a recipe with you I
hope you will like as much as I did
It’s really a simple little meal and tastes
deliciously different. You will need a rather thin sliced little ham. I had one
that I had used my meat slicer to cut thin pieces for sandwiches… so, if you
have no slicer maybe getting ham sliced at the deli would be a good idea.
Regular thin but not wafer slices are fine. I used 6 slices making it for just
myself. The following recipe made about 2 – 3 large servings. So you may wish
to double it for a group.
Also
I’m using a bouillon product that is available here, as folks tend to use it a
lot in Mexican food. However it may not be available in other parts of the
country, so I will also give you a substitute method.

Also I’m going try something different. I usually
try to be specific as to instructions. But
this time I’m going to be very specific in an attempt to bring a method into
cooking instructions. The method is called “MISE EN PLACE
You
will need:
ä
6 slices of boneless or deli ham
ä
1/3 of each red, orange,
and green bell peppers…or… one bell pepper of any color you wish
ä
5 medium or three large mushrooms
ä
½ a medium onion
ä
1 long stalk of celery
ä
about 3-5 cloves of garlic
ä
1 tsp Italian seasoning
ä
½ tsp anise seeds crushed
ä
½ tsp of dried mint
ä
1 tomato/chicken bouillon cube (see photo above), they are twice the amt
of regular cubes. (or two chicken bouillon cubes and 2 tbsp of tomato juice.
ä
Two cups of water for
dissolving the cubes
ä
sea salt and cracked pepper
to taste but very easy on the salt.
ä
2 tbsp corn starch
ä
1 tbsp flour
ä
1 tsp sugar, optional
ä
3 tbsp olive oil
ä
1 tbsp butter or margarine.
ä
Pasta of your choice, follow instructions for two servings.

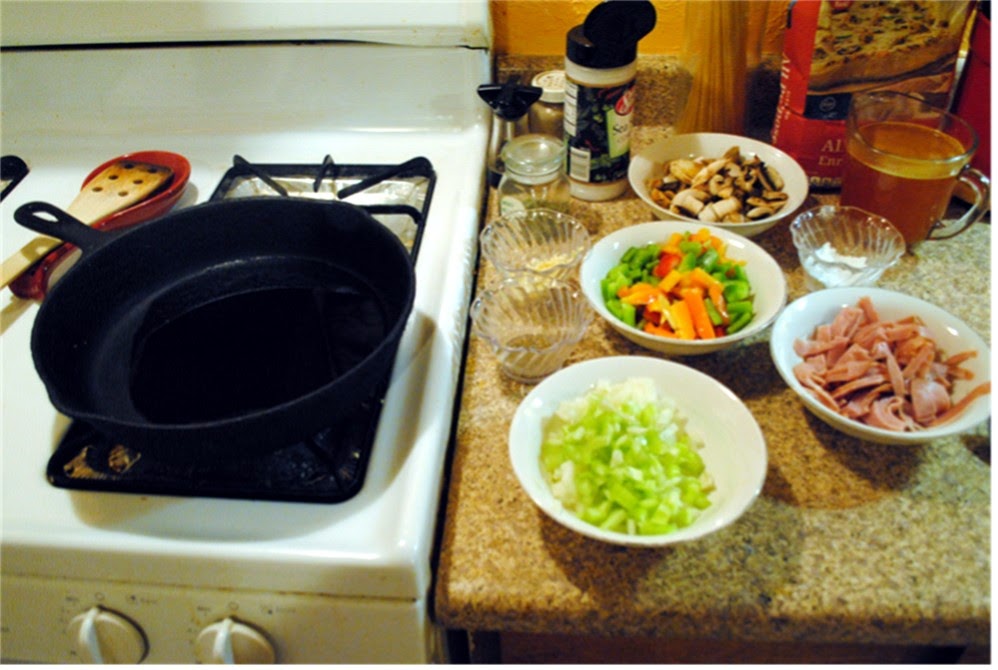
Start by taking
out your ingredients and setting them on your work area. Get a few knives like
a chopper and a paring knife. Get four cereal size bowls and three tiny bowls
or ramekins. Also get a two cup glass
heat proof measure, (or a small
pitcher or jar that holds 16 oz. plus a glass heat proof 1 cup measure) also
its good to have near, a towel and wet dish cloth for your hands, and clean up.
Next you will be chopping
your vegetables and placing them in bowls. Chop the onion half and add the
chopped celery to it. Cut the bell pepper in long (julienne) strips. Then into
about 1-1+1/2 inch lengths place in another bowl. Chop your mushrooms in average slices place
in a third bowl. Mince your garlic small and place in a ramekin. On another cutting
board, roll up all your ham slices from a short side and cut as shown to make
ribbons that are the same length as the long side of your slices. If this is
too long you can cut them in two.


Now crush your anise seeds with a mortar and pestle (or between
two spoons laid on top of each other with the seeds in the bottom one.) add
them and the Italian seasoning to another ramekin. Now mix your corn starch and flour into a
third ramekin.
Dissolve your bouillon cube (or the two for substitute) in 2 cups
of hot water. If substituting add the tomato juice to cup
before adding the water so the combination will equal two cups.
If you wish,
here you can take a moment to clean up your cutting area, wipe it down and
clean off your knives. Put everything away in the fridge and spice shelf etc. Then
set up an area next to your stove where you will be cooking with all the bowls
and ramekins, plus the 2 cup measure of bouillon, and sea salt and pepper
grinder or shakers. And you will be using a large (I like cast iron) skillet.
What you have done here is called Mise en Place, a French cooking term meaning roughly “everything in its
place.” This is a method to keep your cooking area straight, have easier clean
up and have all you need at hand when you need it. By chopping all ahead of
time and cleaning that up before you start on the next task, then setting up
your cooking area you can learn to cook efficiently quickly and neatly. It just
takes preparation. And though it seams more time consuming, once you learn to
cook this way you will find it takes less time because you are working more
efficiently. And in time you will get rather quick at it all and it will be
second nature.

All that’s left now is the actual cooking which will be
extremely quick. Heat in your large skillet the olive oil and the butter or
margarine till the margarine is melted. Usually I’m using two hands for all
this but I was alone so one hand is taking photos. Over a high heated skillet,
Add your onions and celery all at once and mix into the hot oil, till they are
spread evenly around the skillet. Next you will add your bell peppers and do
the same. The order you do this is important cause you are starting with those
things that take the longest to cook and going to the least. After the peppers are spread evenly and mixed
into the onions and celery, add the mushrooms and mix them in. the garlic, and
seasonings, plus a scant amount of salt, and your taste of black pepper, go in
next.

Garlic should usually be added towards the end of recipes so the flavor
holds up better. Mix everything thoroughly and you should see that the onions
are beginning to get translucent. Turn your heat down to medium and add in the
ham ribbons gently mixing them into everything. Once they are well
incorporated, you are going to go to the next step, making this into a sauce.


Sprinkle the cornstarch and flour mixture evenly over the entire
skillet as shown and blend in well. Now
slowly while stirring well add the bouillon mixing all as you go. Once it’s all
in and mixed well you should have a rather thin but viscous sauce. Turn your
heat down to low, and take the time to taste here. You may want to add salt though
I doubt it as the ham and bouillon are usually enough, or you may like the idea
of just a touch of sugar, 1 tsp is what I added. Blend all well and then let
your sauce simmer on low uncovered mixing every few minutes for the next 20
minutes or so. Note the side of the skillet and the level as to how full it is
with sauce. You will want to reduce that level by simmering till it’s about 1/3
less amount. The sauce should be much thicker then.


As your sauce is
simmering and between stirring you can use the time to rinse all your bowls
ramekins, utensils, cups and such and load away into the dishwasher, and then
wipe down the cooking area you used. Put out a large sauce pan for cooking
pasta, fill it with water and (salt and olive oil optional) and start that
boiling. Then set out a colander or strainer in a clean sink. When the water
boils turn it off, you have just got it started and heated for the cooking of
the pasta later which always starts with boiling water. Everything else can be
all cleaned up by the time the sauce is finished. When the sauce is finished,
cover it and turn off the heat. Cook your pasta according to directions on the
package. Another time there will be a pasta cooking hint but it’s not necessary
today to put it here.

 |
| YUMMMM |
When your pasta is done and drained. Serve the sauce over the
pasta and enjoy this with some bread or as I did with garlic knots, which BTW I
will be giving you the instructions and recipe forthcoming. This is a fresher
less heavy pasta dish, with kind of a spring like taste to it. Hope you enjoy
it.
Oh, and after
you are done, if you have followed the method I was showing, all you have to do is rinse and load your
plates, put the leftovers in the fridge, load the last few items and turn on
the dishwasher,… about 5 minutes worth of effort tops, and all is cleaned up
and finished.
Blessings mes amis
No comments:
Post a Comment