Ah for summertime, fresh veggies and
fruits. What a wonderful treat they are, whether they are grown in your garden, a gift from the neighbor, bought
fresh at a roadside stand, or bought in the market on sale as so many of these
things are right now. Corn, tomatoes, grapes, cherries, melons, blueberries,
cucumbers, green beans, color bell peppers, all fresh, are just some of the mix
of beautiful colors the grocers are putting on sale. And this time of year.
Many of your veggies are being brought in quite locally, as opposed to from
South America or such. Every week I am more tempted when I get the sale paper
to get more fruit, tho’ I have oodles of jam already and cannot eat it all
fresh myself.
There are a few fresh corn recipes I hope to get to and share with you, and other fresh veggie ideas. And yet as often is the case, one cannot eat all you can buy on sale really cheap, find, be given, or grow. So what do you do? This is the time of year when you "CAN" things. You make tomato sauce, can green beans… etc… stock up for use later this winter, with what you can get now. Late summer is the time to can the large quantities of those fruits and veggies.


When I was a
child we had three very prolific peach trees, 2 plums, an apple, a pear and a
fig tree, as well as two huge “paper-shell ex-long” pecan trees. So there was
always plenty of stuff to use and to can for the winter. Peaches seemed to be
the thing, however, that we would be giving away pecks of. In June/July when
they would begin to ripen, fresh peaches would be such a juicy and sometime
messy treat right off the tree. Not to mention homemade peach pie, shortcake,
cobbler, ice cream and more. Then my mother would “put up” jars and jars of
peaches for winter. And she would make peach preserves, and one of our favorite
treats, peach, and fig tarts!

As winter wore on,
and fresh peaches were no more, we’d
have the canned ones often for dessert as we had PLENTY. There would come a
time when we got sort of tired of the canned peaches for dessert, but it always
seemed about that time we’d run out. So by summertime we were again excited for
the return of the fresh peaches.

Other things my
mother used to do was make pickles, as cucumbers are easy to grow a lot of. And
she'd can tomatoes. This recipe I’m about to give you though, came about when my
own kids were growing up. One year with so many tomatoes and zucchini from our
garden, the children’s mom and I decided to can them together. And it was such
a success that we forever after did this and enjoyed them through the winter.
We used to use Italian seasoning, and sometimes fresh herbs. This way the
canned tomatoes and zucchini were perfect for Italian recipes.
Now days I have a very good herb garden so
I use fresh herbs in my canning and making tomato sauce, where I simmer a
cheesecloth bag of herbs in the sauce.
Below is a method that while a little time
consuming is still simple and so worth the time taken. It seems I had some
tomatoes and a little squash on hand, Roma pears and zucchini. Then the around
the corner neighbor brought me over a bunch of tomatoes and greyzini and
zucchini squash from his garden. So… time to can!

I started with
about 5 lbs of tomatoes and approximately the same amount of squash.
-5
lbs tomatoes
-5 lbs zucchini squash
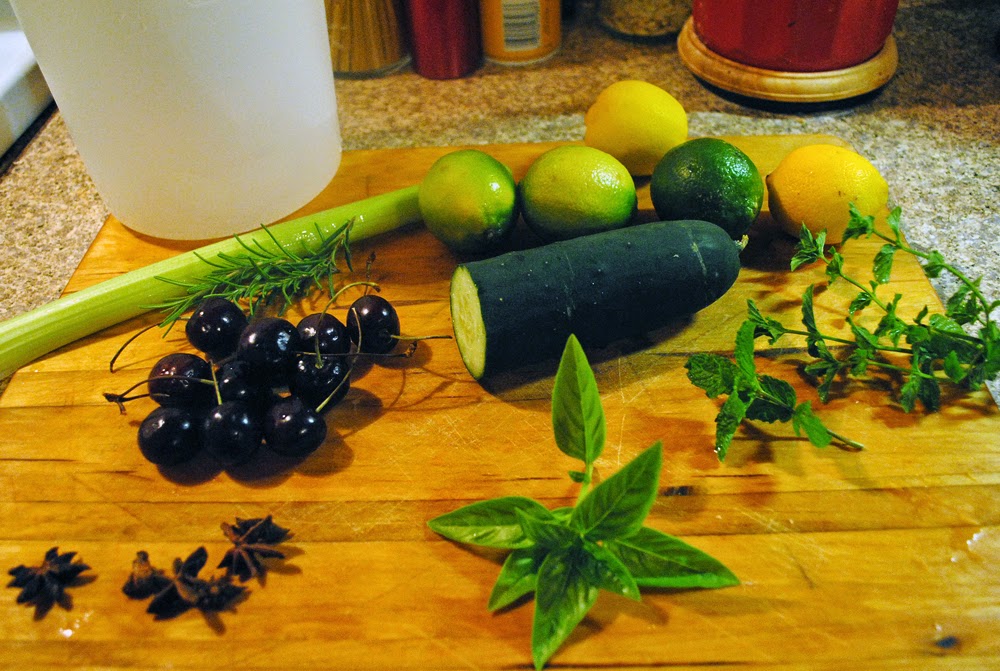
-3 or 4 fresh lemons and the same of limes
-2 bulbs of garlic
-Various fresh Italian
herbs, or Italian seasoning mix. Fresh herbs I used were oregano, both
regular and purple hot-oregano, thyme, rosemary,
basil, mint, sage, and lemon balm.,
of course the dried mix works fine.
-dried hot Thai peppers,
or fresh. Optional!
-sea salt or kosher or
pickling salt, I used a combination of smoked Mexican sea salt and red
Hawaiian sea salt, combined with white
Mediterranean, but its surely not necessary.
-freshly cracked black pepper or pepper
corns, I used black and Peruvian red pepper
corns…again not necessary to use both I just had
these things on hand and thought
it would be fun.

Now for the
process. Many folks boil their jars to sterilize them. I actually just run them
through the dishwasher, the water in the dishwasher is heated way beyond what your
hot-water heater does, and it does fine to sterilize. As well I have the washer
on heated dry, and continue to add more time there if needed, so as I work
it is keeping the jars hot and clean until the moment I take each one out to
can with.
Most of the canning is quick and I usually get it done in one cycle
of heated dry. So plan accordingly as to the timing of your dishwasher so it
hits the dry cycle about the time you are ready for jars.
If you don’t wish
to use this method, or have no dishwasher, boil the jars for 10 minutes on full
boil. Drain and set on a rack to use. Use them hot if you can.


I will say if you
can get a canning jar lifter tool, you need it. For both the sterilized jars
and the hot processed jars later.
You will want to
prepare your ingredients and your work space. First wash the tomatoes and
zucchini of course. Also wash the herbs and set in a strainer. Place a pot to
boil on the burner and blanch each tomato for about 12 seconds so they will
peel easier. Peel and place these tomatoes whole in a bowl of cold water. Now
empty your pot and refill it with water to boil. Place all your jar lids and
screw bands in a glass Pyrex or other deep bowl. When the water boils pour it
over the lids to sterilize them.


While the water
is boiling take all the leaves off the herbs. it seems tedious yes, but you don’t want the
stems, because these herbs will be eaten later not just simmered in a bag and
tossed. You can strip an herb stem by simply running your fingers along the
stem from the top end to the bottom… going against the grain of the direction
of the leaves. This works well for oregano sage and thyme, and maybe mint.
After you have all the clean herbs in piles of leaves, chop them fine. And
place them in a small bowl, just large enough to hold them all. Small is better
for the space in your work area.


Now peel the
garlic bulbs into individual peeled cloves and cut each clove into 2 to 3
pieces. Place these into a small bowl. With a mortar and pestle crush your
dried Thai peppers and black pepper corns, or use a grinder. Place the
crushed/cracked peppers in a ramekin. I
combined my salts next into a little ramekin. If using just one king of salt
place some in a ramekin anyway, you will need about ¼ cup. Next cut your lemons
and limes in half then into quarter sections.

Next chop all
your zucchini into large chunks. Place these into a streamer basket and steam
them for about 4 to 6 minutes. If you have no steamer microwave them for about
3 minutes and toss and then 3 minutes more. You want them to just be steamed
through but still crisp. If you have neither a steamer or microwave steam them
by placing a bit of salty water in the bottom of a large stock pot, add
zucchini and bring to a boil with lid on, after a few minutes remove lid by
lifting the side away from you first, directing the hot steam away from you. With a large wooden spoon toss the chunks of zucchini and return to boil with
lid on.. While they are steaming or after set up your space with all you have
just prepared

A cutting board
is a good surface as you will need to cut your tomatoes some, plus you will be
setting a hot jar down to work. I set myself up as follows you should do
similar. First my dishwasher is just behind where I work, handy for me to grab
one jar at a time from the heated dry cycle.

I had a large
cutting board in place. And a good knife I will need for tomatoes. To the left
I had my “drained”, steamed zucchini still in the steamer basket, and had a
slotted spoon or large fork for spooning them out. To my right I had the peeled tomatoes now
drained of the water. Just right of that was my sterile lids still in the water
(have some tweezers/tongs if water is too hot to get lids out.) and also my
lemon and lime quarters. You will need a small strainer for these.
Behind the cutting board, at say 12 o’clock,
I had my herbs, garlic, salt and pepper, and 1 or 2 tablespoons and 1 or 2
teaspoons for measure.

Cut about 2 to 3 raw
peeled tomatoes into large pieces. Preserve the seeds and watery pulp, do not
lose any of it if you can by placing your tomato pieces cut side up like a
little bowl. You will need the seedy watery pulp for the canning to have enough
liquid.
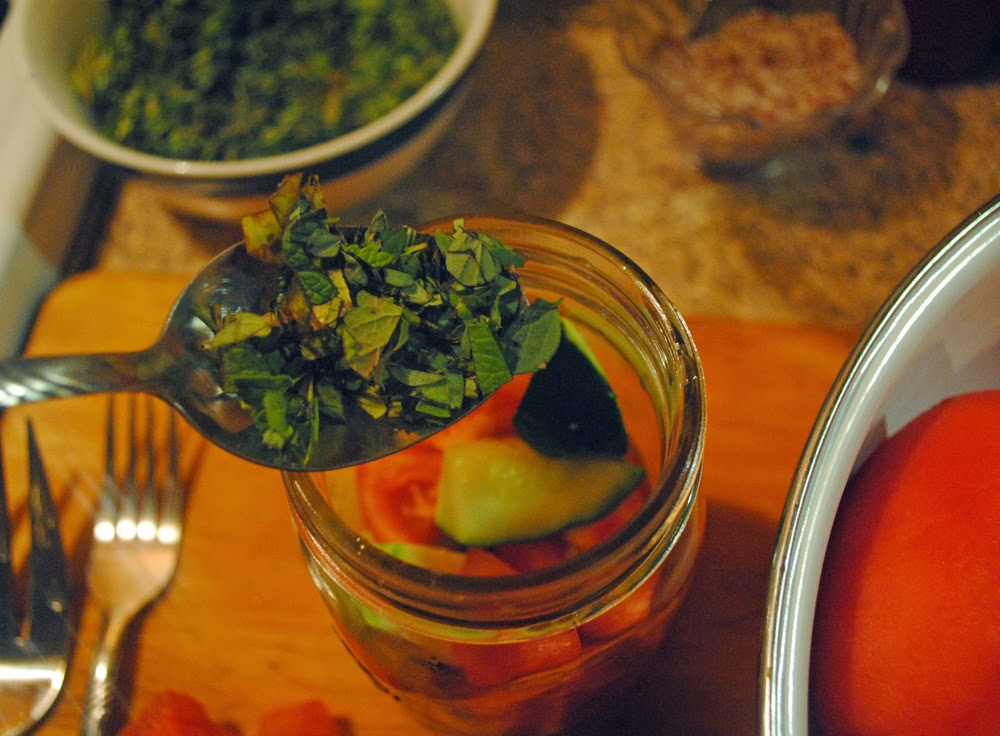
Next take a hot
jar from the dishwasher or rack. Place it on the cutting board and place chunks
of alternating tomato and zucchini in the jar, packing them down with a spoon
as you go. When half way full, add -1 tbsp. chopped herbs, -2 or 3 garlic pieces, -1 tsp of the salt, and -½ tsp of the pepper. Next squeeze
through the strainer -the juice of
one of the lemon sections. Continue to pack tightly, the tomato and zucchini
pieces. When the jar is fully packed add the same amounts of each herbs,
garlic, salt and pepper. But this time squeeze a lime section through the
strainer. You may have to add a few more chunks of veggies to have them packed
tightly (without being mashed), to the top. There should almost be enough
liquid in the jar from the zucchini and tomatoes to already cover the veggies
at least half way up. Processing is going to release a lot more liquid.


Now making sure
the lip of the jar has no debris what so ever on it, so you get a fine seal
take one of your lid seals and place on the jar, next take one of the screw
bands and screw it down very tight to push the seal in place. You will probably
need a pot holder to hold the jar while you do this.
 Now complete the above steps with the remaining jars
until all the veggies are packed in jars and sealed. The next step is
processing. Normally you need only about 10 minutes processing time in a
boiling water bath to do tomatoes, but considering I added zucchini, and
especially the garlic, herbs. I want to cook into the mix a bit, we will
process them more.
Now complete the above steps with the remaining jars
until all the veggies are packed in jars and sealed. The next step is
processing. Normally you need only about 10 minutes processing time in a
boiling water bath to do tomatoes, but considering I added zucchini, and
especially the garlic, herbs. I want to cook into the mix a bit, we will
process them more. 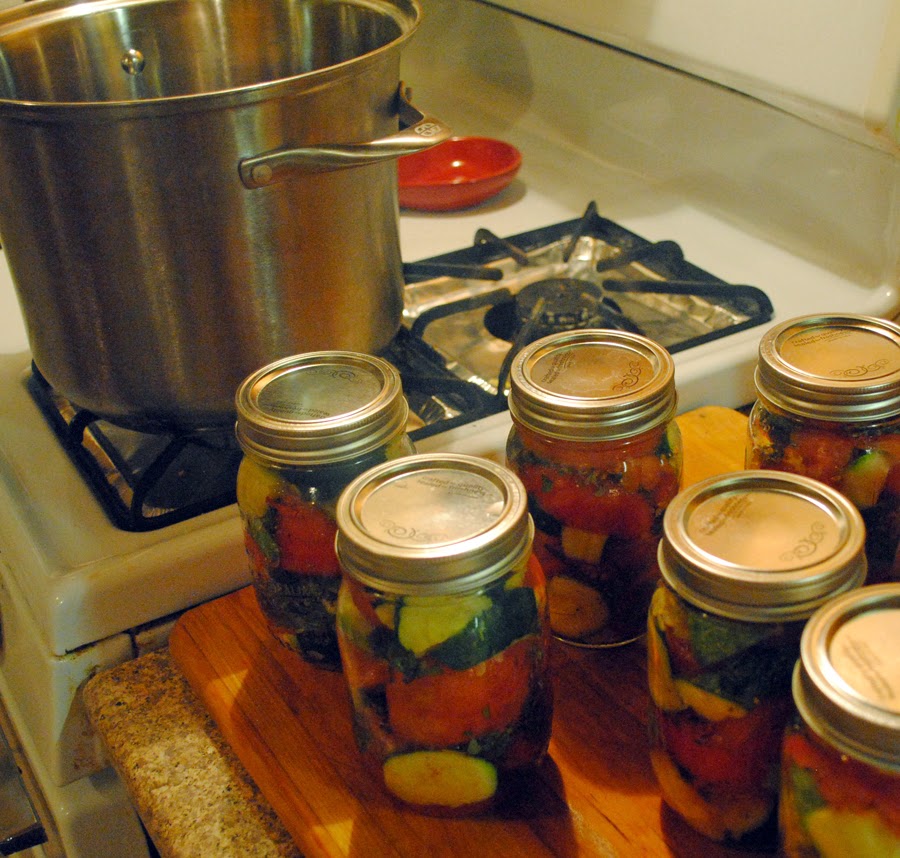
Place your jars
in a large stock pot or some such pot that has a nice fitting lid. Fill with
very hot tap water until the jars are covered with the water. Place on the heat
to start boiling. You can set the lid to the pot on to build up heat. Once the jars start to boil time for one hour, with the lid on. Note you should check after 30
minutes because some of the water will have escaped as steam. Have a large
container you can fill with very hot tap water to gently pour into pot until
the jars are submerged again. Replace the lid and return to boiling. You
needn’t take time off the hour s measured time for this step as it reduces the water temp for
just a tiny amount of time. Use this time to clean up everything else.

When the jars are done turn the heat off
under the pot or take it off the heat. Take the lid off and let them set in the
water for 10 minutes. Next using your jar lifter take each jar out and place
it on the cutting board. Let them cool for about an hour then screw the lids on
the jars even tighter if you can. This sometimes is possible after they cool
the band has contracted, and you want it to be tight. After the jars are well
cooled wipe them off and label them.

These jars of
Italian tomatoes and zucchini are ideal for adding to spaghetti sauce or to
lasagna. They are already seasoned and salted. Another good use is to pour it
over to cook cuts of meat like pork chops or chicken breasts, or to use anyway
so see fit. Blessings mes amis
.jpg)